Big Mac Meatloaf

Standard

Before you scold me for staying up past my bedtime, let me just say I know it’s getting kind of late but I’m too excited over this week’s progress to not share it with you right now! I would have posted earlier, but I had some family stuff come up; I just got the last of my three girls to bed which means I am all yours!  😛

I’m down 4 pounds and I’ve lost 4 inches off my waste in a week; yes you read that right… I said one week!

I think I kind of forgot how great clean eating makes one feel; I haven’t felt this “awake” or had this much energy in too long. I am so grateful I found my way back, and before I was too far gone. It’s not like I have to eat crappy, flavorless foods to get to the place a want to be either; you see the recipes I post, do they look crappy or flavorless to you? I think not.

I think the best way to describe my previous backslide is I GOT LAZY. And I know you’ve all heard the age old line “you are what you eat”; when I was eating the “crap”, it made me feel like “crap” which made me even lazier.

I mean I guess I could think of some better reasons as to why I started slacking on my health; I did some research on breastfeeding while following the ketogenic way of eating and a lot of my research told me that your body needs sugar to produce milk and eating such a small amount of carbs decreases your milk supply (which is the last thing I want to happen), I did also find some cases where this way of eating drastically increased the milk supply but for some reason I decided to listen to the more negative results.

So I kept telling myself I’ll start eating healthier again once I’m done breastfeeding… does that make sense to you, because I’m kind of dumbfounded thinking about it now, like I kind of wanna slap myself in the face a couple of times; how could I possibly have thought that eating junk would provide my baby with better nutrients than eating the way I know to be healthy?!

Lord please help me because I obviously need it…

It wasn’t until I went in for my first WIC appointment since Olivia was born and stepped on the scale only to find out that I had gained 10 pounds since giving birth that I realized something needed to be done before I gained all of that weight back that I had lost pre-pregnancy and some. Eating all that “carbage” is a slippery slope, and I needed to do something before I got to the point of no return.

But… the past is the past and I am back with even more willpower and stronger than ever! And guess what? My milk supply is doing just fine.

Now… for those of you that don’t know what a ketogenic diet is, it is an extremely low carb, moderate protein, high fat diet. Basically, you cut out your sugars and grains (which is a lot easier than it sounds, all you have to do is set your mind to it and you can do it!), and eat more healthy fats.

What it really comes down to is eating real, whole foods.

Do you wanna know what the best part about this way of eating is?

big mac meatloaf6

You get to eat stuff like this big mac meatloaf… and lose weight!

What’s that? You’re drooling? Oh… you NEED the recipe? Haha… I thought you might!

YOU’RE WELCOME!


Yields 6 – 1 slice servings.

Ingredients:

MEATLOAF:

  • 2 pounds ground beef
  • 1 cup mozzarella cheese, shredded
  • ¼ cup heavy whipping cream
  • 1 egg, beaten
  • ½ cup onion, chopped
  • salt and pepper to taste
  • ½ cup pickles, chopped and divided
  • 6 slices American (or American Swiss) cheese slices, divided

BURGER SAUCE:

  • ½ cup mayo
  • ½ teaspoon vinegar
  • 1 Tablespoon mustard
  • ¾ teaspoon paprika
  • ½ teaspoon garlic powder
  • ½ teaspoon onion powder
  • 2 Tablespoons pickle relish
  1. Preheat oven to 350
  2. For the sauce, mix together all ingredients until well combined and set aside
  3. In a large bowl add ground beef, shredded cheese, heavy cream, egg, onion, salt and pepper, and mix until well combined
  4. On a parchment paper lined baking sheet, spread half of the beef mixture into a 9×5 inch rectangle
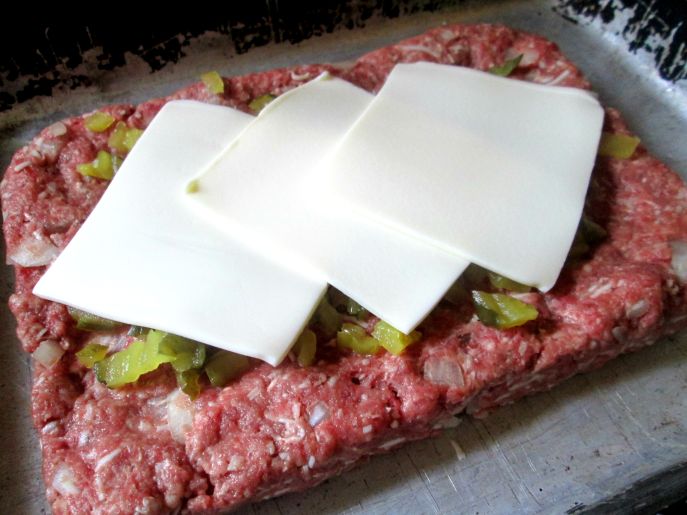
  5. Top the beef with half of the chopped pickles and 3 cheese slicesbig mac meatloaf
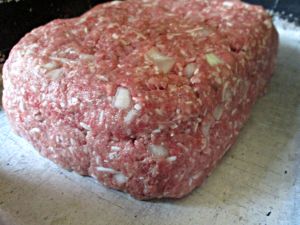
  6. Spread the remaining beef mixture on top of the pickles and cheese; be sure to seal all of the edges so you don’t lose the fillingsbig mac meatloaf2
  7. Bake for 60-70 minutes, until done
  8. Remove from oven and top with the remaining chopped pickles and cheese slices
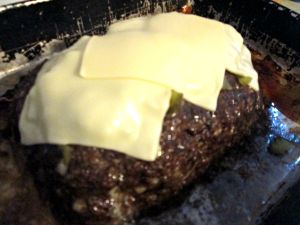
  9. Return to oven and bake for an additional 5 minutes, until cheese is meltedbig mac meatloaf3
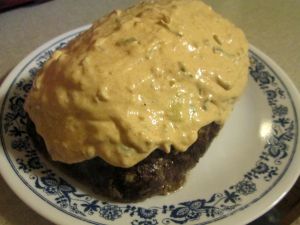
  10. Remove from oven and top with the burger saucebig mac meatloaf4
  11. Slice the meatloaf into 6 pieces and enjoy!

big mac meatloaf5

Per 1 slice serving: 584 calories;  31 grams protein;  47 grams total fat;  5 grams total carbs;  0 grams fiber;  3 grams sugar;  5 grams net carbs

Reuben Hotdish

Standard

I had a clean house for like a whole day; the girls actually cleaned up their toys when they were done playing with them for a change, I had finished all of the laundry (temporarily at least), and I stayed caught up on dishes… all for one whole day! I think I may finally be getting the hang of this “mother of three” thing… YAY ME!

With things going my way, it made it that much easier to avoid my newly reinstalled sugar addiction too! That was until yesterday at least… Kevin’s birthday. The girls and I made a birthday cake so we could celebrate with some cake and ice cream after supper last night. I thought “not a problem”; I’ll just enjoy a small piece and be done. Technically the cake wasn’t a problem… it was the frosting!

You know how when you make frosting you have to dip your finger in to do a little taste test until you get the flavor just right? Well I did that, and then I got the flavor just right, and then I did that again… and again… and again… and I think you get the picture. Curse you delicious sugary frosting!

Oh well, today is a new day and there’s no point in beating myself up over a little too much frosting. The good news is I don’t have any birthdays to worry about for a while now… ok about a month I guess. But… I don’t believe I will be in charge of that cake, so no more frosting temptations for this girl anytime soon.

So let’s get back to our regularly scheduled programing… REAL FOOD! I’m going to be living vicariously through you all today. You see I can’t eat cabbage for the time being… which means I don’t get to enjoy sauerkraut anymore [insert childish tantrum here]. Baby Olivia eats what I eat, and cabbage makes the girl gassy (very gassy)… so we will be putting those foods, along with a few others, on the backburner for a while.

Here’s where the problem comes in; this Rueben hotdish is one of my favorite recipes… but it has sauerkraut in it. And I can’t just take out the sauerkraut; it’s like one of the main components of this dish.

So here’s my solution:

  1. I’m going to share the recipe with you guys
  2. I want you to make it for supper tonight… or tomorrow is fine too…
  3. I want you to take a picture and share it with me so I can enjoy it with you

Seriously though, this hotdish is like a foodgasm in your mouth! No lie… you NEED to try it!

(Adapted from Caveman Keto’s recipe for Reuben casserole, you can find the original recipe here.)

Yields 4 – ¼ pan servings.

Ingredients:

  • 8 ounces roast beef, sliced
  • ½ cup onion, chopped
  • 1 cup swiss cheese, shredded
  • ½ cup cheddar cheese, shredded
  • 1 ½ cups sauerkraut
  • ½ cup mayo
  • 2 Tablespoons relish
  • 1 Tablespoon dijon mustard
  • ¾ teaspoons paprika
  • ½ teaspoon vinegar
  • ½ teaspoon garlic powder
  • ¾ teaspoon onion powder
  1. Preheat oven to 350
  2. Chop the sliced roast beef into bite size pieces and transfer to a large mixing bowl
  3. Add the onion, shredded cheeses, and sauerkraut to the chopped roast beef and combine
  4. In a separate bowl, mix together the remaining ingredients until well combined
  5. Add the sauce to the large mixing bowl and mix until well combinedrueben hotdish4
  6. Evenly spread mixture into a lightly greased 8×8 baking dish
  7. Bake for 40-45 minutes, until the dish starts to bubble and brownrueben hotdish6
  8. Remove from oven and enjoy!

rueben hotdish8

Per ¼ pan serving: 484 calories;  39 grams total fat;  24 grams protein;  9 grams total carbs;  2 grams fiber;  3 grams sugar;  7 grams net carbs

Bacon Cheeseburger Smothered Chicken Breasts

Standard

First things first… I would like to introduce you all to the reason I’ve been so preoccupied!

IMG_5329

Meet our beautiful daughter Olivia. She finally graced us with her presence on July 15th. Adding another little person to our family has been nothing less than an adventure, and we’re only at the beginning.

OK confession time: I kind of fell of the wagon as of late. See I’ve had a lot of extra emotions since coming home from the hospital and it’s been a little stressful, to say the least, trying to get back into the groove of things. I haven’t quite figured out how to juggle being a mom to three beautiful and time demanding girls alongside keeping up with housework. I am beginning to slowly (very slowly) find a routine that works for us, but getting this far has definitely taken it’s toll on me.

To help me deal with all these “feelings”, I’ve taken up a new hobby… stress-eating. My drug of choice: ice cream; and not just any ice cream… Blue Bunny’s Peanut Butter Panic ice cream (peanut butter ice cream with peanut butter cup pieces, a thick fudge swirl, and a peanut butter swirl). Do you wanna know the worst part? It doesn’t even make me feel any better! Sure it tastes delicious when it first touches my lips, but almost immediately after I finish my GIANT bowl of the stuff I start to feel bloated and sick. So in reality what I’m doing to make myself feel better is really only making things worse!

That is why I’ve decided that today is the new Day 1 on my journey to a healthier me. I will be kicking my bad habit to the curb yet again in exchange for a healthier lifestyle that I already know will make me feel amazing, not to mention all of the other benefits that will come along with it!! To hold myself accountable I will be posting weekly updates on my progress that you can find here.

And I will continue to post amazing new recipes along the way; starting with this delicious and oh so simple recipe for bacon cheeseburger smothered chicken breasts. All you really do is pile everything together in a baking dish… it doesn’t get much easier than that!

Yields 6 – 1 breast servings.

Ingredients:

  • 6 chicken breasts
  • 12 slices bacon, chopped
  • 6 Tablespoons ranch dressing
  • 6 slices American cheese
  • ½ cup cheddar cheese, finely shredded
  1. Preheat oven to 350
  2. Fry the chopped bacon until crispy; remove from pan and set aside
  3. In a single layer, arrange the chicken breasts into a lightly greased 9×13 inch baking dish
  4. Spread the ranch dressing out evenly on the chicken breasts
  5. Top each chicken breast with sliced American cheese (NOTE: you can break up the cheese however you wish to evenly cover all of the chicken)bacon cheeseburger smothered chicken breasts3
  6. On top of the sliced cheese, distribute shredded cheese then bacon evenlybacon cheeseburger smothered chicken breasts5
  7. Bake for 30-35 minutes, until chicken is done and the cheese starts to bubble and brownbacon cheeseburger smothered chicken breasts6
  8. Remove from oven and enjoy!

bacon cheeseburger smothered chicken breasts8

Per 1 breast serving: 351 calories;  23 grams total fat;  32 grams protein;  3 grams total carbs;  0 grams fiber;  1 gram sugar;  3 grams net carbs

Sausage and Cabbage Skillet

Standard

We’ve got a very intense round of “the waiting game” going on here. I’m just over 36 weeks, but… I have started dilating and since my doctor’s appointment last Thursday I’ve been having some pretty strong contractions (on and off). I thought for sure we were going to be having this baby that day; my contractions were only like 5 minutes apart and strong enough that I couldn’t really talk through them! Then of course they decided to subside after a few hours. Today especially I’ve been having a very difficult time walking or sitting or standing (due to all this extra pressure)…

Up until recently I’ve been telling people this pregnancy has just been flying by; which it has been until these pesky contractions decided to start under way. Now each day seems so far away that I feel like I’m living each day a week at a time!

Yeah… I’m not really doing so well at being patient anymore.

P.S. Due to me nearing the end of my pregnancy you might not hear too much from me for a little while. I’ll be pretty busy getting to know a very special little person… I’m sure you all understand!

I have good news though… today’s recipe requires virtually no waiting at all! The whole dish is made in one pan which makes for minimal clean up AND it only takes maybe 15 minutes to make from start to finish! Talk about a quick and easy supper!

Yields 4 – 1 cup servings.

Ingredients:

  • 4 Tablespoons butter
  • 1 pound brats, sliced to ½ inch
  • ½ cup onion, chopped
  • 6 cups cabbage, chopped
  • ½ teaspoon garlic powder
  • salt and pepper to taste
  1. Melt the butter in a large skillet over medium high heat
  2. Add the sliced brats and onion and fry the mixture until the onion is soft and translucent
  3. Mix in cabbage and seasonings and fry until the cabbage is tender (approx. 10 minutes), stirring frequently
  4. Remove from heat and enjoy!

sausage and cabbage skillet2

Per 1 cup serving: 629 calories;  51 grams total fat;  28 grams protein;  15 grams total carbs;  3 grams fiber;  8 grams sugar;  12 grams net carbs

Cauli-Hash Breakfast Bake

Standard

I think I may be in “nesting” mode… at least a little bit. It’s kinda hard to tell with me because I’m such a clean-freak anyways; it seems as though I’m always cleaning! This past weekend though, the cleaning/organizing has been a bit more baby oriented; I felt the need to dig out the bassinet from storage and clean that, all of the newborn-3 month baby clothes have been taken out of their totes and washed, and Madisen’s closet has been cleaned out and reorganized to make room for the baby.

Maybe I’m jumping the gun a little bit since I am only a little over 35 weeks in… but at the same time, I’M ALREADY A LITTLE OVER 35 WEEKS IN! It just seems crazy to think that this little bundle of joy will be here in about a month… maybe even sooner.

One thing I haven’t done yet is pack my hospital bag. Partly because I’m so unsure as to if this baby is actually a girl or a boy. Yes we were told it’s a girl, but everyone (and I mean everyone) is convinced that we’re having a boy.

As Randee continues to say “we have to wait and see”, I guess she’s right… but that makes for one anxious momma!

So I’ve been kind of obsessed with eggs lately, maybe it’s the baby, but eggs are just so darn tasty these days! Whether they’re fried, scrambled, or made into an omelet… it doesn’t matter how you cook them, if they are sitting in front of me I cannot resist; I will devour them!

This egg bake is one of my FAVORITE breakfast recipes, although now that I think of it I don’t think I’ve actually made it for breakfast once… Oh well! The cauliflower “hash brown” crust imitates a real hash brown crust so well and this is one of those recipes that is so easy to switch up; you can pretty much use whatever meats, veggies, and cheeses you have lying around in your fridge… YAY FOR VERSATILITY!!

Yields 6 servings.

Ingredients:

CRUST

  • 1 head cauliflower, shredded
  • ¼ cup butter, melted
  • salt and pepper to taste

FILLING

  • ½ pound seasoned pork sausage
  • 8 slices bacon, chopped
  • 6 green onions, chopped
  • 1 cup mushrooms, chopped
  • 6 eggs
  • ½ cup heavy whipping cream
  • ½ teaspoon mustard
  • 1 ½ cup sharp cheddar cheese, shredded
  • salt and pepper to taste
  1. Preheat oven to 425
  2. Combine shredded cauliflower, melted butter, salt and pepper, and spread into the bottom of a 9×13 baking dishcaulihash breakfast bake2
  3. Bake for approx. 30 minutes, until the cauliflower is tender and the top starts to browncaulihash breakfast bake3
  4. Remove from oven and set aside
  5. Change oven temperature to 350
  6. Brown the seasoned pork sausage and fry the chopped bacon until crispy, set aside
  7. In a mixing bowl, combine eggs, heavy whipping cream, mustard, salt and pepper, and beat until frothy
  8. Fold the cooked meat, vegetables, and cheese into the egg mixture until well combinedcaulihash breakfast bake4
  9. Pour the egg mixture over the top of the cauliflower crust and spread out evenlycaulihash breakfast bake5
  10. Bake 30-45 minutes, until eggs are set and the top starts to browncaulihash breakfast bake6
  11. Remove from oven and let sit 5 minutes
  12. Cut the dish into 6 slices and enjoy!

caulihash breakfast bake9caulihash breakfast bake8

Per serving: 480 calories;  36 grams total fat;  26 grams protein;  12 grams total carbs;  4 grams fiber;  5 grams sugar;  8 grams net carbs

Twice-Baked Cauliflower

Standard

Yesterday was a day… to say the least. You know, the kind where you just want to hide in the bathroom and sit in front of the closed door with a quart of your favorite ice cream and stream something on your iPad in the hopes that you can have just a couple of minutes to yourself; yeah it was that kind of day!

It didn’t start out that way, both of my girls woke up in a fantabulous mood; we went for a little early morning stroll, Randee was on her best behavior for most of the day, I almost thought I was dreaming because she was listening so well, and Madisen was mommy’s little helper all morning!

But then… along came nap time/quiet time, or at least what used to be known as nap time/quiet time. Since Madisen has been sleeping in her big girl bed instead of the crib, nap time has been pretty hit or miss in our household. That’s not always a bad thing, because we can go to the pool or the park or just play outside on the really nice days instead of having Madi cooped up in her room sleeping the beautiful day away; but yesterday, I think her nap would have done us all some good (she’s not quite at the point where she doesn’t need a nap yet), and Madisen has yet to truly grasp the meaning of “quiet time” so it just kind of doesn’t happen unless she’s sleeping.

Randee on the other hand was still being very well behaved at this point, so she was having her “quiet time” when Madisen decided it would be a good idea to start beating up on her to get her to play. Needless to say, Randee didn’t really want to play with someone who had just been trying to sit on her face… so I tried to explain quiet time to Madi once again. Well it kind of worked… for all of 3 seconds.

I knew Madisen was just tired and if she sat still for more than a minute she would probably fall asleep, but she knew that too…

A trip to the park might help to burn off some steam and get her to a place where she’s ready to take a nap right? WRONG… oh so wrong! I think it might have made things worse actually. Of course she was fine at the park for the hour and a half we were there, it was when we had to leave to start cooking supper that she had a complete meltdown; it took all of 12 minutes for me to get her strapped into her car seat, and that doesn’t count the time it took to get her off the play equipment and into the van in the first place.

So we finally get home; I’m cooking supper, the girls are watching a movie, but then Madisen must have realized she was getting sleepy again and she just wasn’t going to let that happen. Instead of giving in to her much needed cat nap she thought she’d come into the kitchen and cry/scream “MOMMY, MOMMY, MOMMY” while wrapping herself around one of my legs as tight as she could.

Have you ever tried cooking supper with a screaming toddler attached to your leg? It doesn’t exactly make things any easier.

I kept on pushing though… I cooked up some major comfort food at its absolute finest last night and I knew it would all be worth it if I could just make it to the table.

We just filled our freezer with some freshly butchered chickens that Kevin’s sister raised… so one of those lovely birds spent the day roasting in the crockpot, we had some freshly picked asparagus left in the fridge from a couple of days ago that I cooked and slathered in butter, and last but certainly not least I cooked up my twice-baked cauliflower.

I’ve seen recipes around Pinterest for this dish, which is what gave me the idea, but every one that I looked at was low-fat/fat free plus they just didn’t have the ingredients I was looking for to be truly reminiscent of twice-baked potatoes… so I made up my own. It tastes so close to the potato version only BETTER! And comforting, oh it is so comforting; I was even able to drown out the screams of a hungry, but tired and unwilling to eat Madi for a couple of seconds just by putting a spoon full of this delectable dish into my mouth.

This dish has become a family favorite, even my Randee loves it; she of course has to pick out all the little green things because “green is such a yucky color”… but even having to do that she said, and I quote, “Mmm mmm mmm, Mommy you make the best dinners ever!”

You’ve got to try it for yourself! You’ll never want to go back to potatoes again!!!

Yields approx. 8 – 1 cup servings.

Ingredients:

  • 1 head cauliflower
  • 8 slices bacon, chopped (divided)
  • 4 ounces cream cheese
  • ½ cup sour cream
  • 4 Tablespoons butter
  • 4 green onions, chopped
  • ¼ cup parmesan cheese, grated
  • 1 cup cheddar cheese, finely shredded (divided)
  • salt and pepper to taste
  1. Preheat oven to 350
  2. Break cauliflower into small florets and boil until soft and tender but not mushy, approx. 5-7 minutes
  3. Drain and return to pot
  4. Fry bacon until crispy, then transfer to a paper towel to absorb any excess grease
  5. Use a potato masher or the back of a spoon or fork to mash the cauliflower, being sure to leave some small chunks
  6. To the mashed cauliflower, add cream cheese, sour cream, butter, green onion, parmesan cheese, ½ cup of the shredded cheese, about half of the fried bacon, and salt and pepper to taste; mix until well combined
  7. Transfer the mixture to a casserole dish and top with remaining shredded cheese and bacontwice baked cauliflower2twice baked cauliflower3
  8. Bake for 30-35 minutes, until the mixture is heated through and the cheese is melted to your liking
  9. Remove from oven and enjoy!

twice baked cauliflower4

Per 1 cup serving: 271 calories;  23 grams total fat;  11 grams protein;  5 grams total carbs;  1 grams fiber;  2 grams sugar;  4 grams net carbs

Broccoli and Bacon Ranch Salad

Standard

It seems as though my 4 year old and 2 year old have traded lives with two teenagers the past couple of days. My girls have been EXTRA sassy, EXTRA stubborn, and not wanting to listen to anybody twice as much (the 2 year old a just a tad more so than the other).

  • The word “NO” is literally the worst word they could possibly hear.
  • If either of them doesn’t like something… you will hear an over exaggerated “HUH!” complete with crossing of the arms and stomping of the feet.
  • There have been quite a few screams of “I DON’T LIKE YOU”.
  • Temper tantrums have been in full force… I’m talking throwing themselves to the ground, kicking their feet and pounding their fists, all while having the energy to scream at the top of their lungs.
  • One of them has tried refusing to eat until she gets her way (it hasn’t worked in her favor yet).

If I didn’t enjoy having hair so much I would have probably pulled it all out by now!

Although having no hair would probably be a lot more comfortable in this humidity that just won’t go away, mother nature just can’t seem decide what kind of mood she’s in. It’s supposed to rain then it’s not supposed to rain, it’s supposed to be cooler then it’s hot and humid instead…

And I’ve been having a heck of a time trying to do our menu planning. The weather forecast just isn’t that reliable these days… so I never know if I’m actually going to be able to turn on the oven or use the grill. The day it’s forecasted to be in the mid 60’s and rainy, I’ll plan something for the oven but then it will be in the mid 70’s and super humid because it didn’t rain like it was supposed to and those are not exactly ideal conditions to add that much more heat to the house by turning on the oven so I’ll have to improvise. Tomorrow I have something for the grill planned, but with my luck it will probably rain (even though it’s not supposed to) and I will be back in the house cooking on the stove instead.

You can always play it safe with cold dishes though… that’s where my broccoli and bacon ranch salad comes in handy. Serve it up with some delicious grilled food or anything out of your fridge really. The only heat needed is that to fry the bacon so even on the days too hot to cook you can enjoy some good food.

broccoli and bacon ranch salad2

Yields approx. 6 – 1/3 cup servings.

Ingredients:

  • 1 bunch fresh broccoli, cut into small florets (approx. 2 cups broccoli florets)
  • 6 slices bacon, chopped
  • 3 green onions, chopped
  • ½ cup cheddar cheese, finely shredded
  • ½ cup mayo
  • reserved bacon drippings
  • 1 ½ teaspoon vinegar
  • 1 Tablespoon heavy whipping cream
  • 1 Tablespoon parmesan cheese, grated
  • 1 ½ Tablespoons homemade ranch seasoning
  • 1/8 teaspoon salt
  1. Fry bacon until crispy, remove from pan and set aside; be sure to save any bacon drippings
  2. In a small mixing bowl, whisk together mayo, vinegar, heavy whipping cream and reserved bacon grease (NOTE: I got about 2 Tablespoons of bacon grease from the 6 slices of bacon)
  3. Mix in parmesan cheese and remaining seasonings
  4. Add broccoli florets, bacon bits, green onions, and cheddar cheese to the dressing; mix until well combined
  5. You can serve immediately, or let the salad sit in the fridge for a couple of hours so the flavors can soak together

broccoli and bacon ranch salad3broccoli and bacon ranch salad4

Per 1/3 cup serving: 265 calories;  25 grams total fat;  7 grams protein;  3 grams total carbs;  1 gram fiber;  1 gram sugar;  2 grams net carbs

SUPER Meatloaf

Standard

I can hardly believe it, my baby girl turns TWO… tomorrow! Where has the time gone!? Although she’s technically not a year older until tomorrow, we celebrated her birthday a week early. Madisen loves Mickey Mouse so there really was no better fit than a Mickey Mouse Clubhouse themed party! There was an array of Mickey Mouse themed food, a fun banner (that I made myself I might add), and CAKE! You know I love Pinterest for party planning; it just makes everything so easy! All you have to do is type in a few keywords, such as Mickey Mouse birthday, and whole bucket full of ideas comes up!109

The food set up consisted of:

011

And don’t think I’ve forgotten about the cake! I wasn’t feeling as ambitious this time around, but Madi likes things a tad simpler than Randee anyways… so it worked out.097

This big girl of mine hit another milestone last night, Madisen spent her first night sleeping in her big girl bed! I had to tell her that the crib was broken to get her to even think about looking at it, but once she got comfy it didn’t take long for her to fall asleep. She got a few extra bedtime stories, a song, and some extra mommy cuddles so it did take a bit longer than usual to get her to bed… but I won’t complain too much.

Besides, we will be welcoming a new member to our family in just a little over a month so we kind of need the crib free. It’s probably best we get Madi transitioned before the baby comes or we’ll be having to figure out how to sleep two people in one crib, and I get the feeling that wouldn’t turn out so great…

So last night we had meatloaf for supper and as I was mixing everything up for this beefy goodness a craving hit. I wanted a meaty, cheesy sandwich like majorly bad; I went with it and ended up kind of building a sandwich with layers of the beef meant for the meatloaf. The end result… a cheesy, extra meaty masterpiece that I couldn’t wait to stuff in my mouth! I guess these pregnancy cravings can be good for something…

Yields 6 servings.

Ingredients:

  • 2 pounds ground beef
  • ¼ cup onion, chopped
  • 1 egg, beaten
  • 1 teaspoon garlic powder
  • salt and pepper to taste
  • 6 slices American/swiss cheese (American cheese would work as well)
  • 8 slices hard salami
  • 6 slices deli sliced ham
  1. Preheat oven to 350
  2. In a mixing bowl, mix together ground beef, chopped onion, egg, and seasonings until well combined; divide into 3 equal sections and set aside
  3. In a greased loaf pan, press out one section of the ground beef mixture into the bottom of the pan and up the sides about ¼ of an inch
  4. On top of the first layer of beef arrange the hard salami followed by 2 cheese slices and another layer of beef (NOTE: when adding a layer of beef, be sure to push down the edges before forming the meat up the side of the pan to ensure you don’t lose any filling)
  5. On top of the second layer of beef, place 2 cheese slices and arrange the sliced ham followed by the last 2 cheese slices
  6. Press together all of the edges to make sure everything is well sealed
  7. Bake for approx. 90 minutes, until done
  8. Remove from oven and let sit for 5 minutes or so
  9. Slice the meatloaf into 6 equal sections and enjoy!

super meatloaf2

Per 1 slice servings: 377 calories;  28 grams protein;  26 grams total fat;  3 grams total carbs;  0 grams fiber;  3 grams sugar;  3 grams net carbs

Loaded Deviled Eggs

Standard

Why is it that heat and humidity make people so darn crabby? I’m particularly referring to little miss Randee; I am left to assume it is the heat and humidity anyways since this girl got over 12 hours of sleep last night, and the crankiness didn’t come out until we were outside in said “heat and humidity”.

I’ve already been called a “bad girl” about 6 times today, told that my “attitude” is not appreciated twice, threatened with tattling to Daddy that I’m being a “bully” and a “big meany” (all because I wouldn’t stop at the store to buy her a special treat), and it’s still early in the day!

Randee sure has been developing a certain sassiness that just seems to grow more and more every day; and it’s been making for some interesting conversation! Now if you’re a fellow mommy (or daddy) then you need to check out this app called LittleHoots that I ran across; it’s perfect for recording and keeping track of all those priceless things that your little one says. You can record full conversations or single quotations, add a fun background and pictures if you’d like, and share your creation on social media or keep it for yourself. On top of that, this handy little app keeps everything organized by date so you can remember how old your child was when they said [INSERT ADORABLE QUOTE HERE]. And guess what; it’s FREE! I’ve fallen in love with this app and I think if you have kids you’ll appreciate it too… so I feel obligated to share!

And Randee’s not the only child of mine growing up; Madisen turns TWO in a week! Even though I’ve watched her grow, it’s still so hard to believe how much she’s grown in the past year! I mean my baby is starting to talk in complete sentences, she’s pretty much a professional puzzle doer, and she has so much care and compassion for other people it’s crazy! I know I’m kind of bragging here… but as a parent it’s my God given right! Besides… I have some pretty amazing kids!

Now I know some of you would probably just rather a new recipe so I’ll get on with it… I made these loaded deviled eggs to pair with some pork chops on the grill the other night and they were so delicious! Not to mention perfect for a hot day like today, just boil the eggs the night before or earlier in the morning before the heat really hits and you’ve got one less thing to worry about.

loaded deviled eggs4

Yields 5 – 2 half egg servings.

Ingredients:

  • 5 eggs, boiled
  • 2 Tablespoons mayo
  • ½ teaspoon dijon mustard
  • ¼ teaspoon salt
  • 3 slices bacon, chopped
  • reserved bacon drippings
  • 2 green onions, chopped
  • 10 slices pickled jalapenos, chopped
  • ¼ cup cheddar cheese, finely shredded
  • paprika for dusting
  1. Cut boiled eggs in half length-wise,  carefully remove yolks and transfer to a small mixing bowl; set the halved egg whites to the side
  2. Fry bacon until crispy, remove from pan and set aside; be sure to save any bacon drippings (NOTE: I got about 1 Tablespoon of bacon drippings from the 3 slices of bacon)
  3. Mash the egg yolks with the back side of a fork
  4. Mix in the mayo, dijon mustard, salt, and bacon drippings
  5. Add bacon, green onions, pickled jalapenos, and cheddar cheese; mix until well combined
  6. Carefully pile the mixture into the bowls of the egg whites
  7. Sprinkle the tops with desired amount of paprika and enjoy!

loaded deviled eggs2loaded deviled eggs5

Per 2 half egg serving: 187 calories;  15 grams total fat;  10 grams protein;  1 gram total carbs;  0 grams fiber;  1 gram sugar;  1 gram net carbs

Jalapeno Popper Hotdish

Standard

VICTORY!! Madisen is napping at the moment… for the third day in a row now! We just closed on almost a full week of this little girl refusing to take her naps. The way I see it, she has been growing (I swear… this girl is in a constant growth spurt) and too hungry to take the time out of her busy day of eating for a nap. During the time that she would normally be napping she has been snacking instead; although I feel like “snacking” is the wrong word to use because her snacks have been more like meals.

If she keeps this up she is going to outgrow Randee in no time. For those of you that don’t know my family and me personally, Madi is a 2 year old in the body of a 3-4 year old. Yeah she’s a big girl (she takes after her daddy).

When she’s in one of these constantly eating phases, which usually happens at least 1-2 times a month, she about eats us out of a house! Seriously though… I made this “no-dough pizza” a couple of nights ago, loaded it with ground beef, extra pepperoni, mushrooms, and A LOT of cheese, Madisen about ate half the pan to herself (and she was still hungry)!!

And aside from this seemingly always growing girl… this growing baby in my tummy has been asking for extra food lately too! In turn, our grocery lists have been getting a bit longer and our extra cash has been getting a bit shorter. It can be rather frustrating at times, but using ground meat to make hotdishes (or casseroles as some of you non-Minnesotans may know them as) can help stretch your meat at least a little bit further than say burgers or steaks every night. This recipe for my jalapeno popper hotdish is one of my favorites right now!

Yields 4 – 1 cup servings.

Ingredients:

  • 1 pound ground beef
  • 1/3 cup jalapenos, chopped
  • ½ teaspoon cumin
  • 1 teaspoon garlic powder
  • salt and pepper to taste
  • ½ cup heavy whipping cream
  • 4 ounces cream cheese
  • ¼ cup almond flour
  • ½ cup parmesan cheese, grated
  • 2 Tablespoons butter, melted
  • 1 cup sharp cheddar cheese, finely shredded
  1. Preheat oven to 350
  2. Brown ground beef with cumin, garlic powder, and salt and pepper
  3. In a small saucepan bring heavy cream to a simmer
  4. Whisk in the cream cheese until melted and smooth
  5. In a greased 8×8 baking dish, layer browned ground beef, jalapenos, shredded cheese, and cream mixturejalapeno popper hotdishjalapeno popper hotdish2jalapeno popper hotdish3jalapeno popper hotdish4
  6. In a small bowl combine almond flour and parmesan cheese, add melted butter and mix until well combined
  7. Crumble the mixture on top of the cream mixturejalapeno popper hotdish5
  8. Bake for 20-25 minutes, until bubbly and brownjalapeno popper hotdish6
  9. Remove from oven and enjoy!

jalapeno popper hotdish7

Per 1 cup serving: 688 calories;  55 grams total fat;  45 grams protein;  5 grams total carbs;  1 gram fiber;  0 grams sugar;  4 grams net carbs


*The last time I made this dish I just happened to be out of grated parmesan cheese, so I used the same amount of shredded mozzarella cheese instead; the end product with the mozzarella vs. the parmesan is more of a flaky crispiness than a bready crispiness… both delicious!!